目次
Moto360をBluetooth経由でデバッグする理由
通常、Androidスマートフォンやタブレットには、microUSBポートがあるのでUSB経由でデバッグモードを有効にすることができます。これまで発売されたAndroid WearスマートウォッチであるSamsung Gear LiveやLG G WatchにはmicroUSBポートがありませんが、充電ドックに給電するためにmicroUSBポートがあり、そこにACを挿すことでスマートウォッチを充電することができます。
![gear-live-review7](https://androidlover.net/wp-content/uploads/gear-live-review7-500x331.jpg)
またそのmicroUSBポートは充電だけでなく、Androidスマートフォンやタブレットと同じようにUSBデバッグを有効にすることができます。詳しくはSamsung Gear Live(Android Wear)のADBデバッグ時のドライバインストール方法。を参照してください。
対してMoto360はQi規格のワイヤレスで充電を行うため、Moto360の充電スタンドではUSBデバッグを有効にすることができません。
その代替策として、Bluetooth経由でデバッグを有効にします。
準備しておくこと
1.Android SDKをインストール後、platform-toolsフォルダをダウンロードしてadbコマンドが通るようにしておく。手順はAndroid SDKのインストール方法(Windows8.1)と最新のplatform-toolsをダウンロードする方法。を参照してください。2.Moto360の開発者向けオプションを表示させておく。手順はMoto360の開発者向けオプションを表示させる方法と項目一覧。を参照してください。
Moto360のデバッグモードをBluetooth経由で有効にする
Android SDKのインストールなどの準備が終わったら、Moto360のデバッグモードを有効にしていきます。Bluetooth経由でデバッグをオンにする
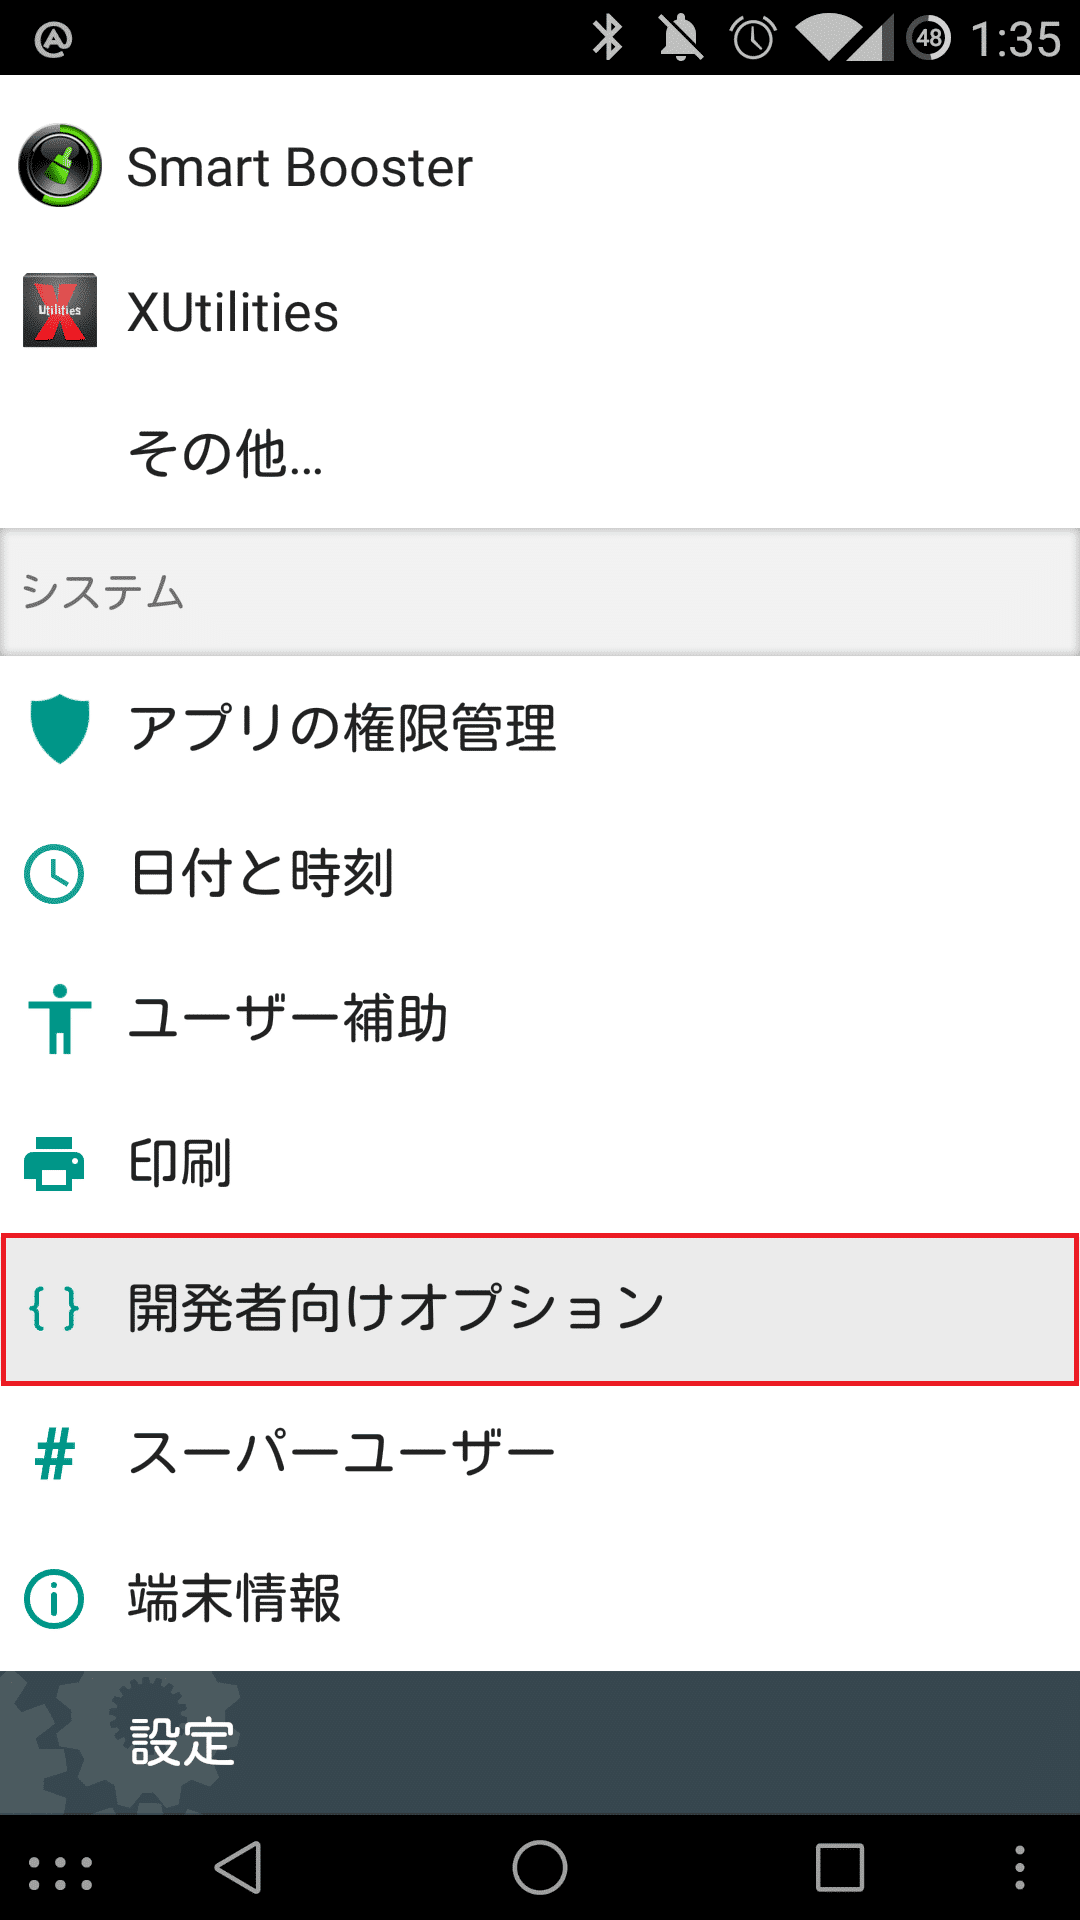
まず、Moto360のBluetooth経由でのデバッグをオンにします。開発者向けオプションをタップします。
![moto360-bluetooth-debug0.1](https://androidlover.net/wp-content/uploads/moto360-bluetooth-debug0.1-500x331.jpg)
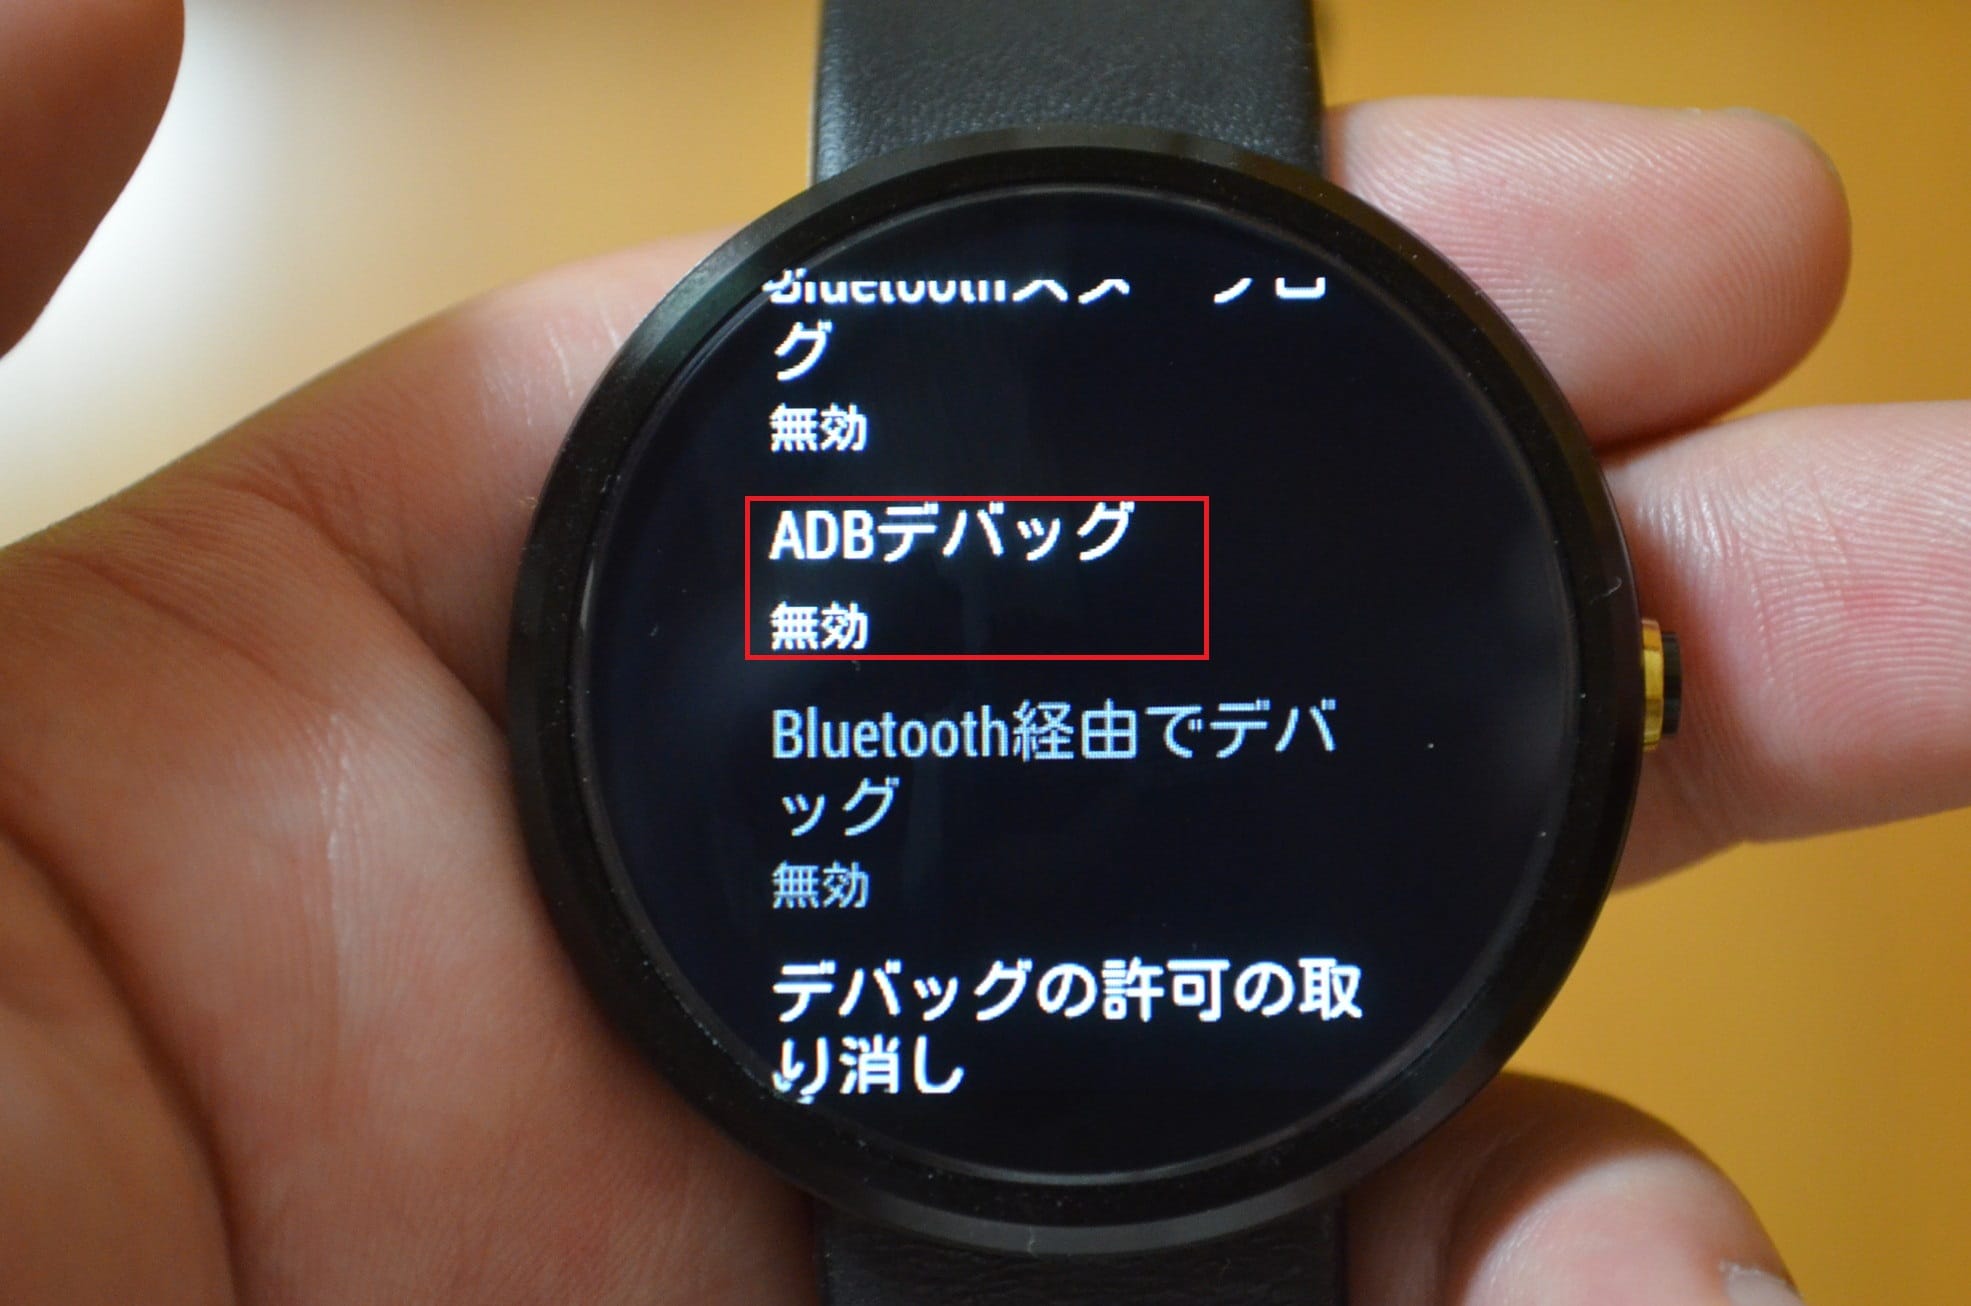
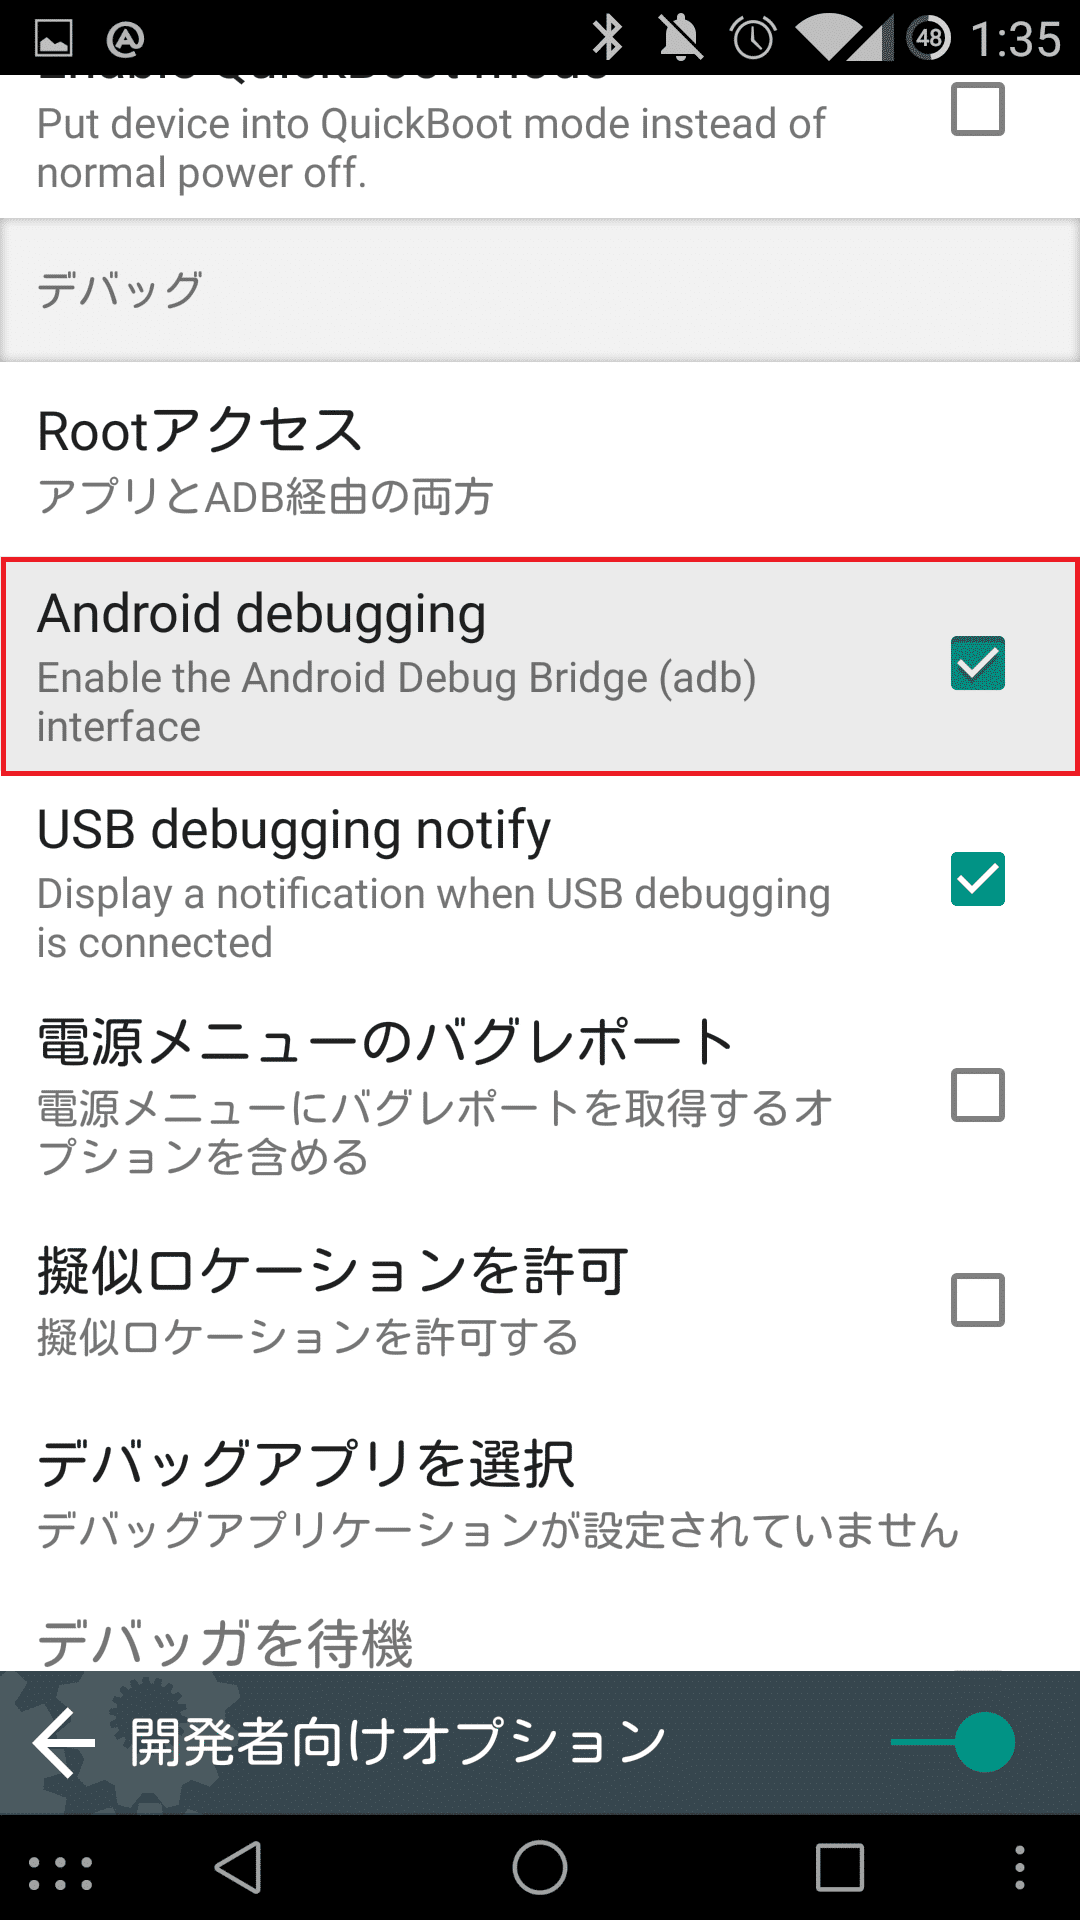
ADBデバッグが無効だとBluetooth経由でデバッグがグレーアウトしていて有効にできません。「ADBデバッグ」をタップします。
![moto360-bluetooth-debug0.2](https://androidlover.net/wp-content/uploads/moto360-bluetooth-debug0.2-500x331.jpg)
「ADBデバッグ確認」が表示されるのでチェックアイコンをタップします。
![moto360-bluetooth-debug0.3](https://androidlover.net/wp-content/uploads/moto360-bluetooth-debug0.3-500x331.jpg)
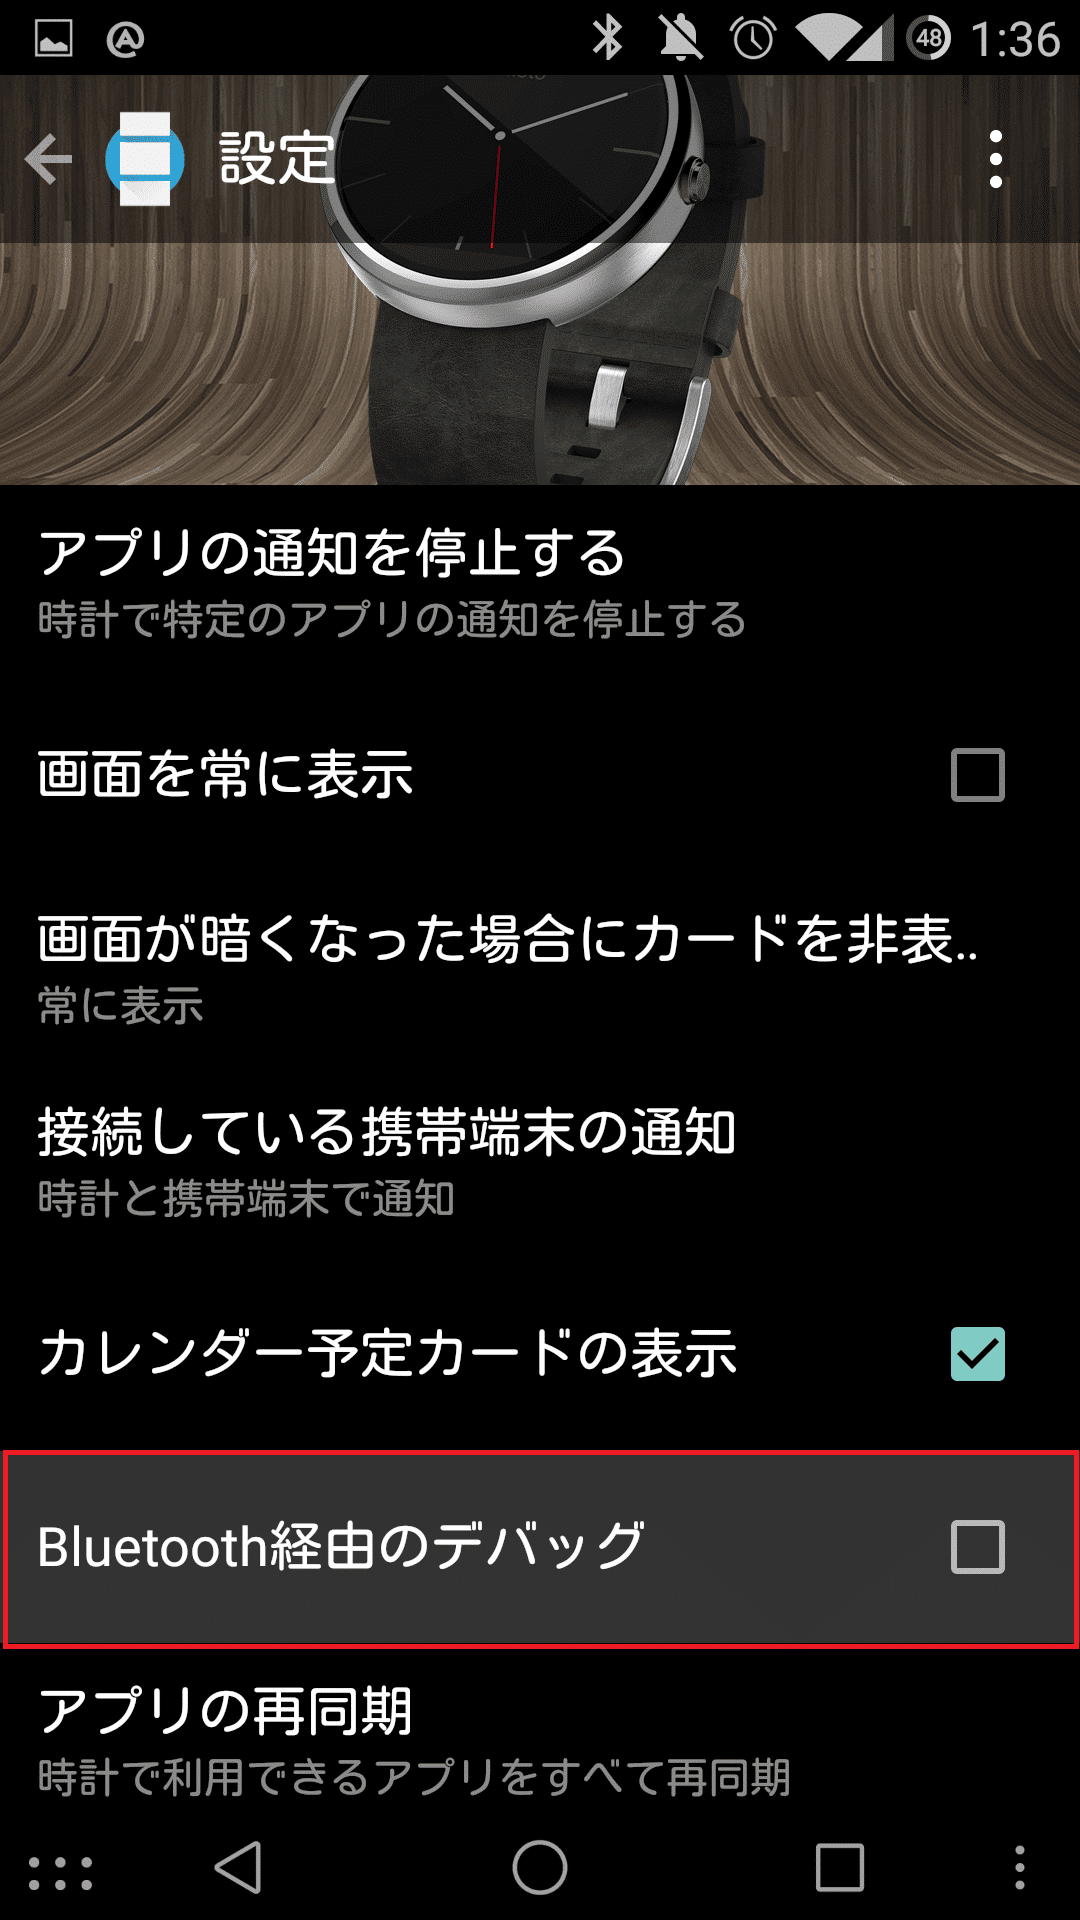
ADBデバッグが有効になると、Bluetooth経由でデバッグの有効/無効を選ぶことができるようになります。「Bluetooth経由でデバッグ」をタップします。
![moto360-bluetooth-debug0.4](https://androidlover.net/wp-content/uploads/moto360-bluetooth-debug0.4-500x331.jpg)
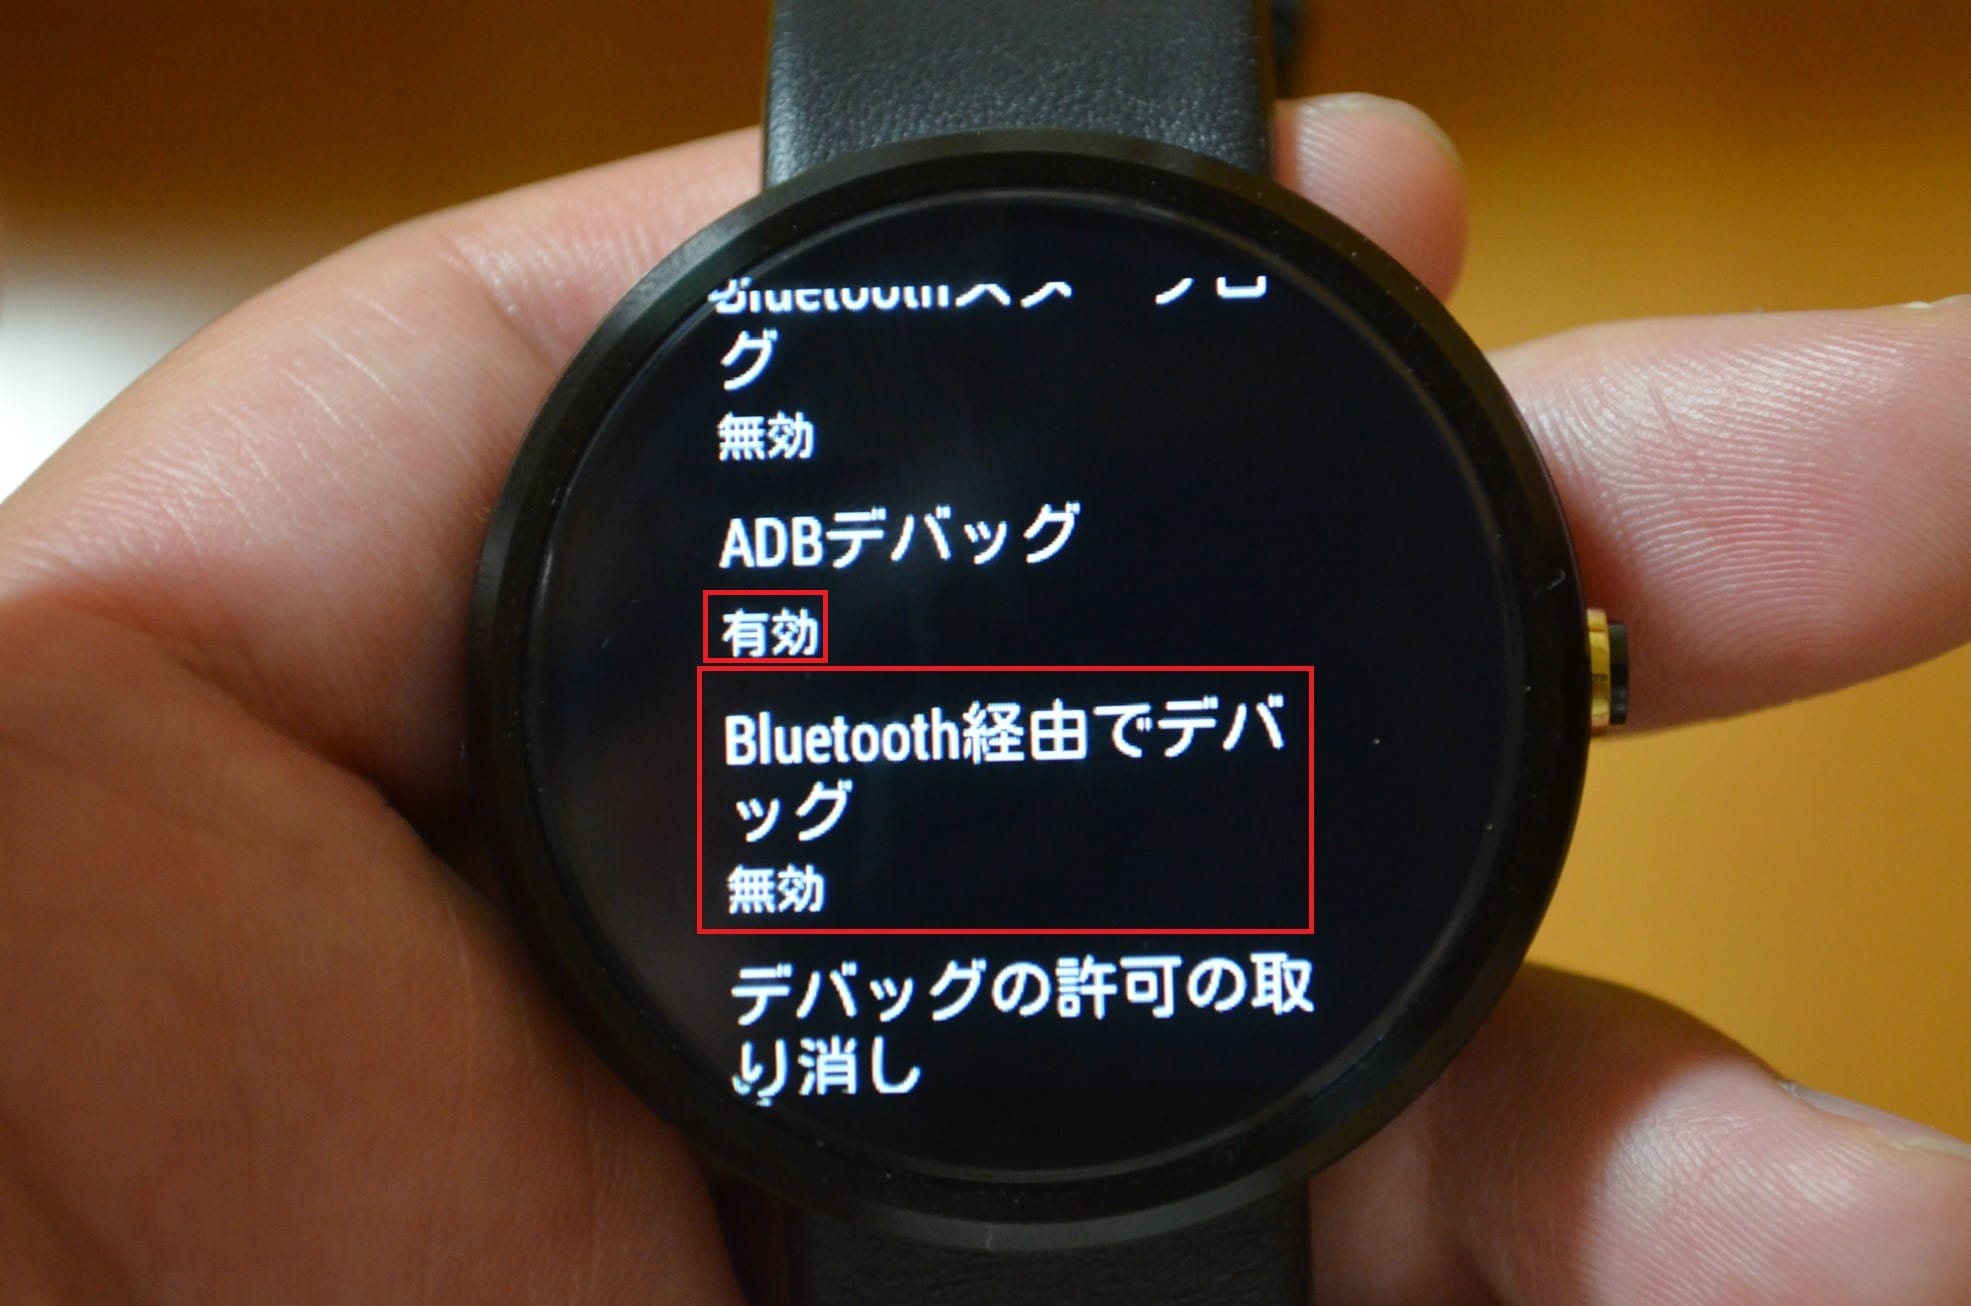
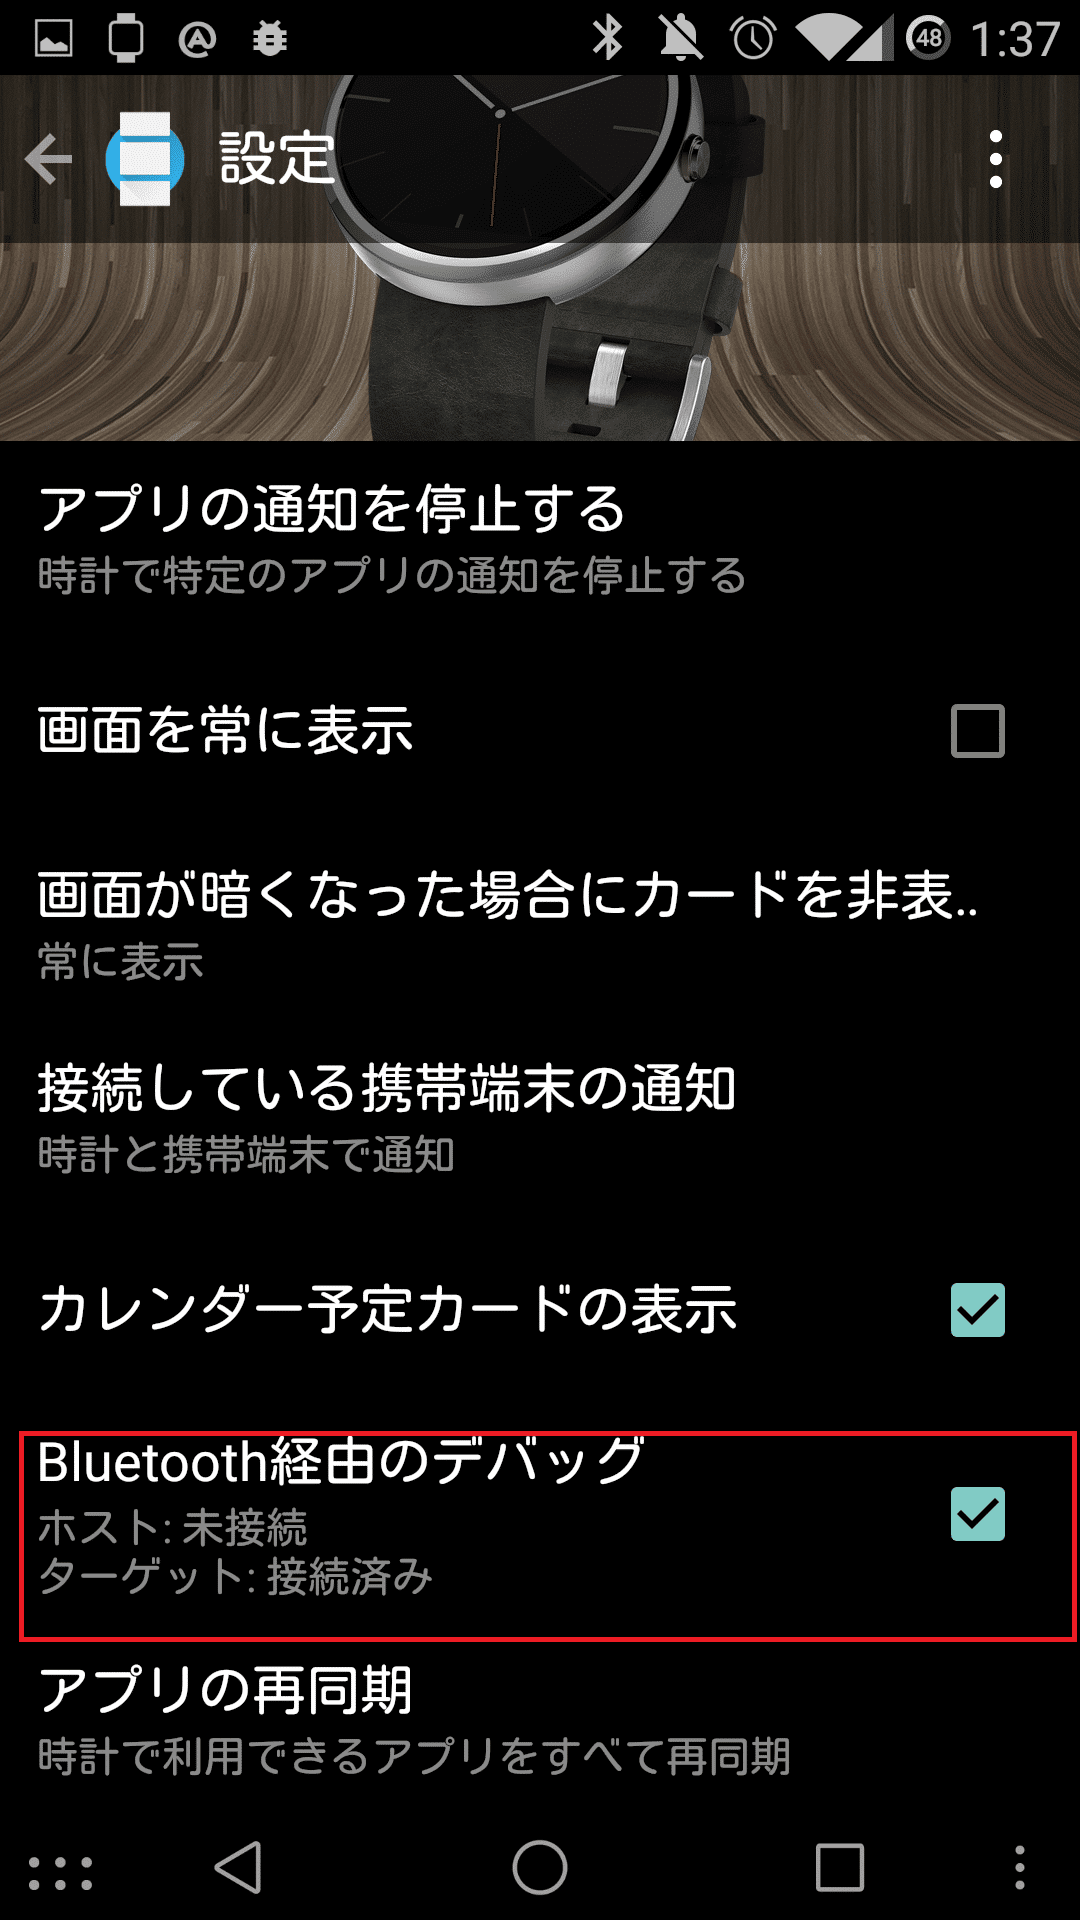
「Bluetooth経由でデバッグ」が有効に切り替わります。
![moto360-bluetooth-debug0.5](https://androidlover.net/wp-content/uploads/moto360-bluetooth-debug0.5-500x331.jpg)
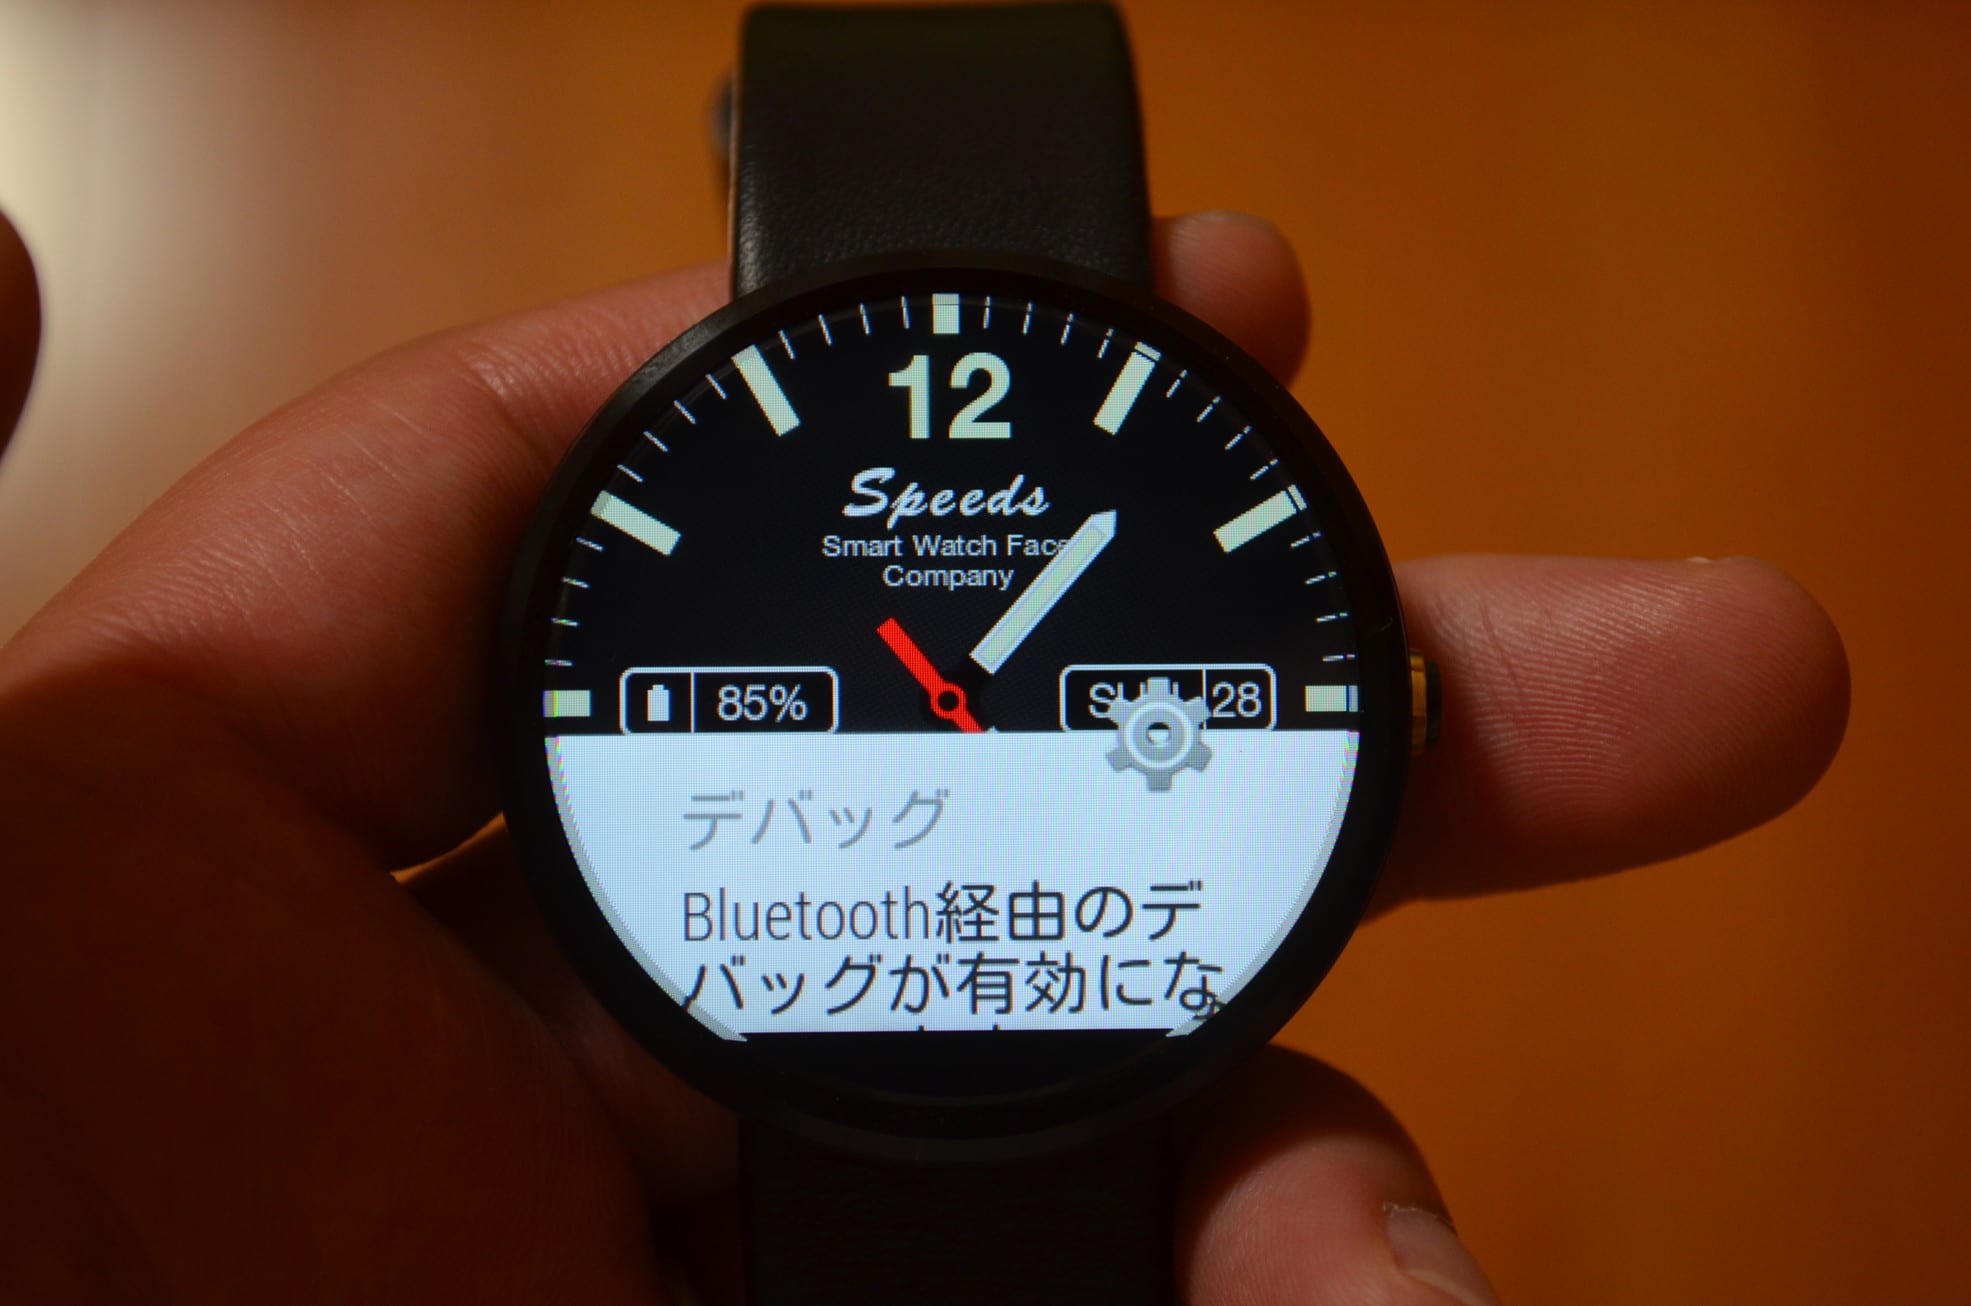
Moto360に「Bluetooth経由のデバッグが有効になっています。」と書かれたカードが表示されれば、Moto360の設定は完了です。
![moto360-bluetooth-debug0.6](https://androidlover.net/wp-content/uploads/moto360-bluetooth-debug0.6-500x331.jpg)
![moto360-bluetooth-debug0.7](https://androidlover.net/wp-content/uploads/moto360-bluetooth-debug0.7-500x331.jpg)
Moto360とペアリングしているAndroidデバイスの開発者向けオプションを有効にする
Moto360とペアリングしている端末の開発者向けオプションを有効にします。私は現在、Moto360とOnePlus Oneをペアリングしています。
設定>開発者向けオプションをタップします。開発者向けオプションがない場合は、Nexus 7 Android 4.2で消えた開発者向けオプションを表示させる方法。を参照してください。
![moto360-bluetooth-debug1](https://androidlover.net/wp-content/uploads/moto360-bluetooth-debug1-281x500.png)
Android Debugging(USBデバッグ)にチェックを入れます。
![moto360-bluetooth-debug2](https://androidlover.net/wp-content/uploads/moto360-bluetooth-debug2-281x500.png)
Android WearアプリからBluetooth経由のデバッグを有効にする
次に、Android WearアプリからBluetooth経由のデバッグを有効にしていきます。Android Wearアプリを起動後、右上の設定アイコンをタップします。
![moto360-bluetooth-debug3](https://androidlover.net/wp-content/uploads/moto360-bluetooth-debug3-281x500.png)
「Bluetooth経由のデバッグ」にチェックを入れます。
![moto360-bluetooth-debug4](https://androidlover.net/wp-content/uploads/moto360-bluetooth-debug4-281x500.png)
「ホスト:未接続 ターゲット:接続済み」となればOKです。
![moto360-bluetooth-debug6](https://androidlover.net/wp-content/uploads/moto360-bluetooth-debug6-281x500.png)
adbコマンドでMoto360のBlutoothデバッグを実行する
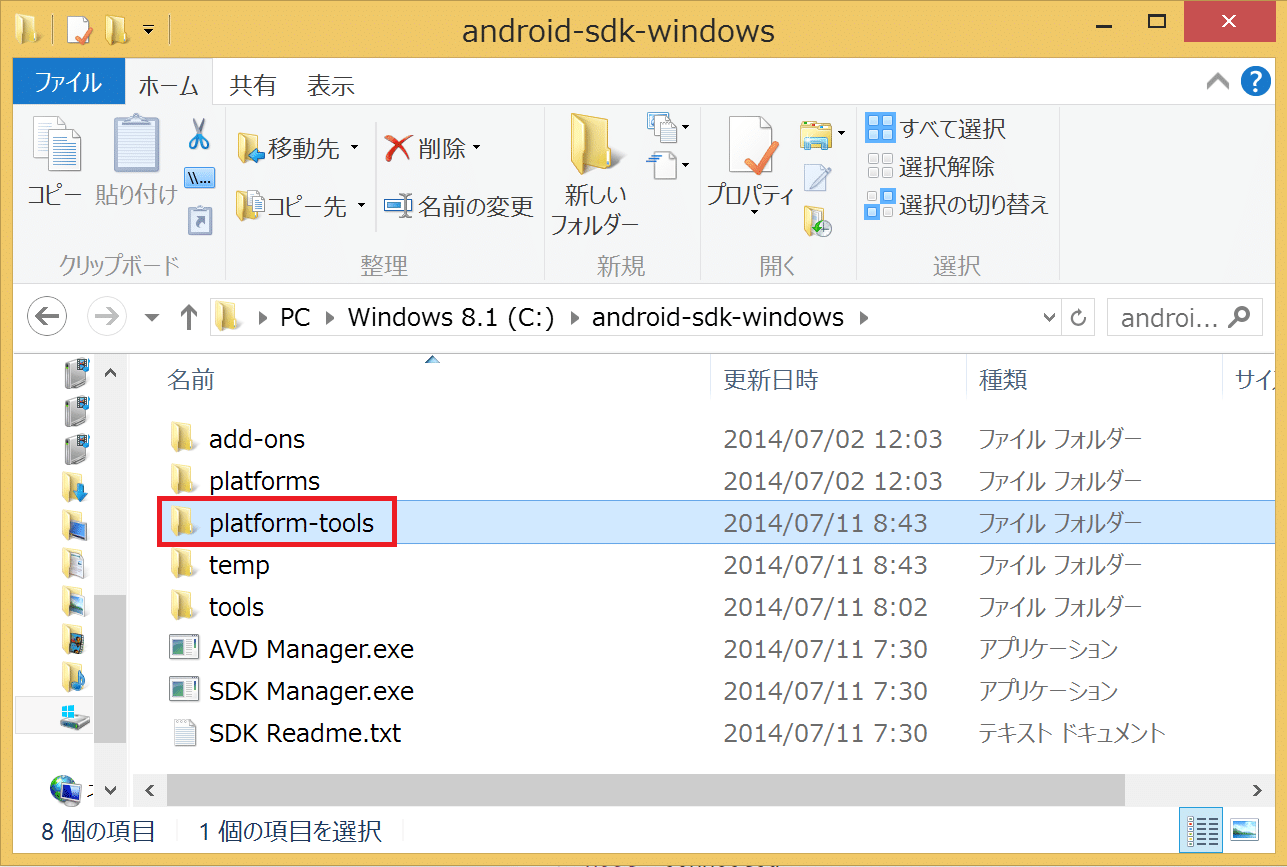
最後に、adbコマンドでMoto360のBluetoothデバッグを実行します。Android SDK Windowsの中のplatform-toolsフォルダをダブルクリックします。
![moto360-bluetooth-debug10](https://androidlover.net/wp-content/uploads/moto360-bluetooth-debug10-500x336.png)
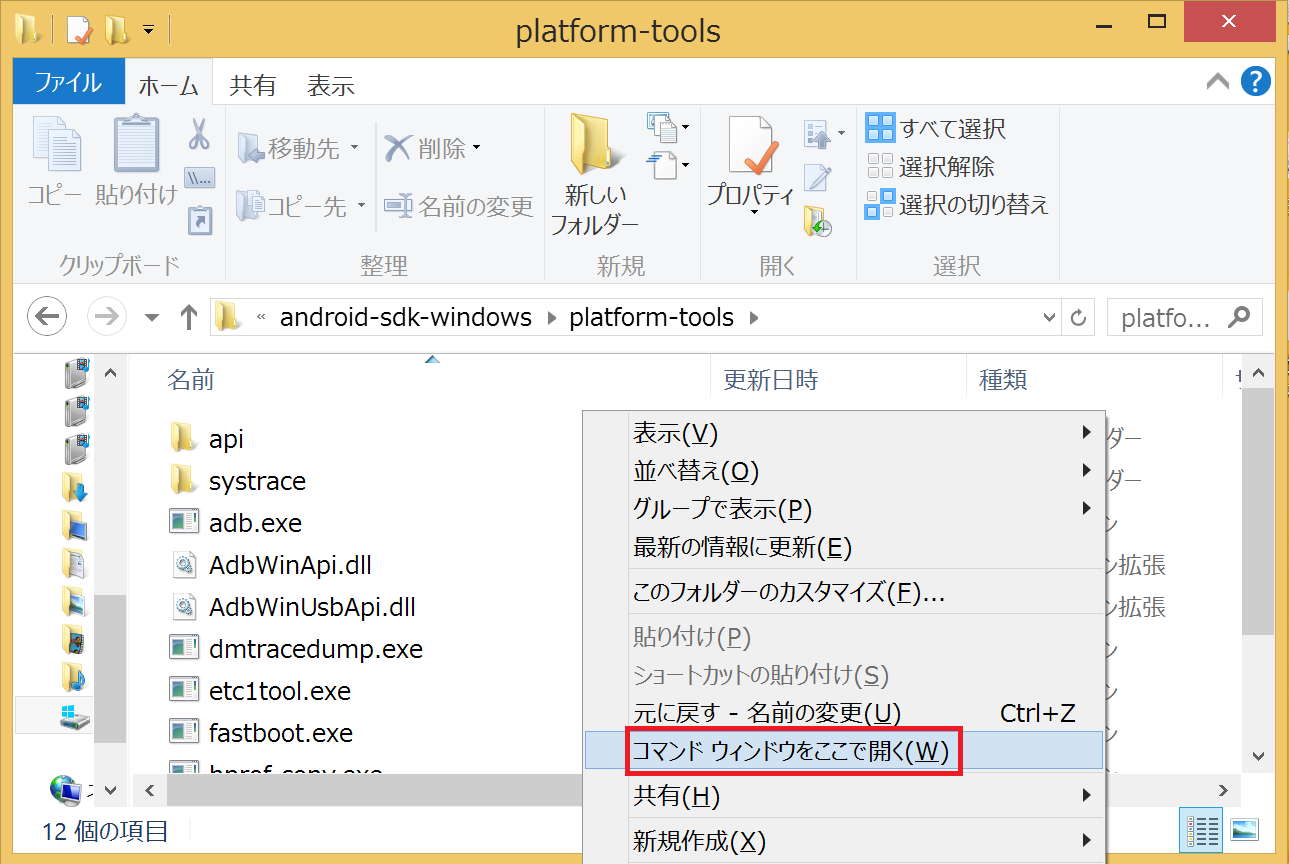
空いたスペースでShiftキーを押しながら右クリックして、「コマンド ウィンドウをここで開く」をタップします。
![moto360-bluetooth-debug11](https://androidlover.net/wp-content/uploads/moto360-bluetooth-debug11-500x335.png)
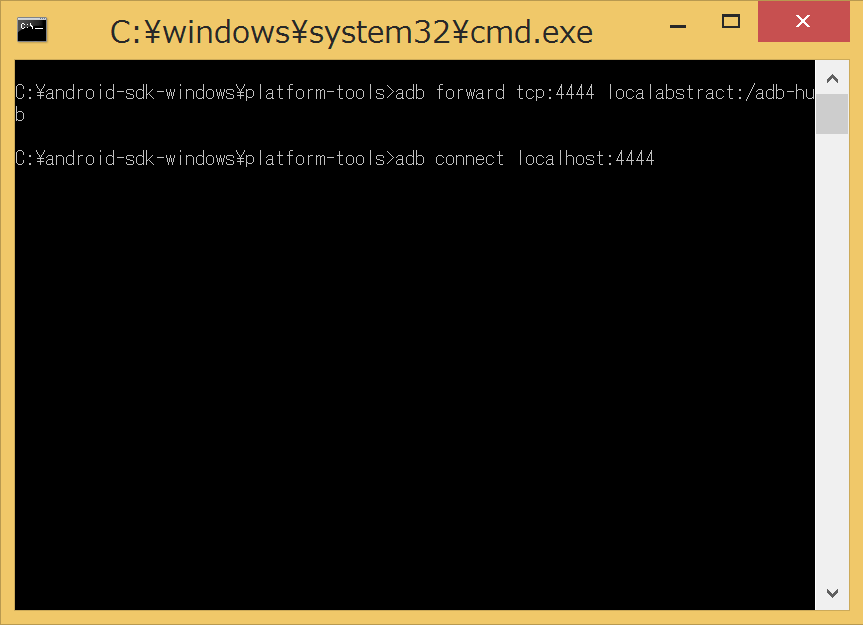
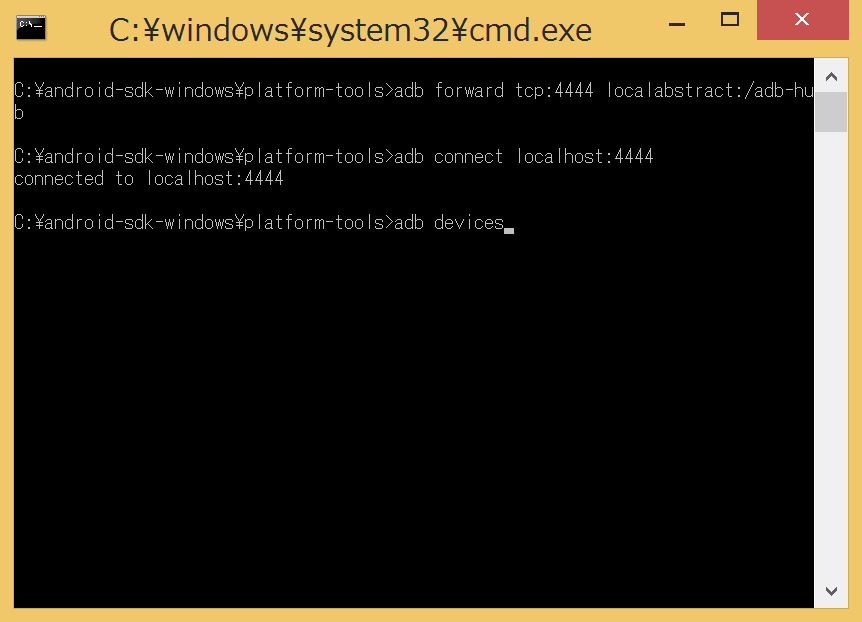
コマンドプロンプトが起動するので、「adb forward tcp:4444 localabstract:/adb-hub」と入力してEnterキーを押します。
![moto360-bluetooth-debug12](https://androidlover.net/wp-content/uploads/moto360-bluetooth-debug12-500x359.png)
「adb connect localhost:4444」と入力してEnterキーを押します。
![moto360-bluetooth-debug13](https://androidlover.net/wp-content/uploads/moto360-bluetooth-debug13-500x362.png)
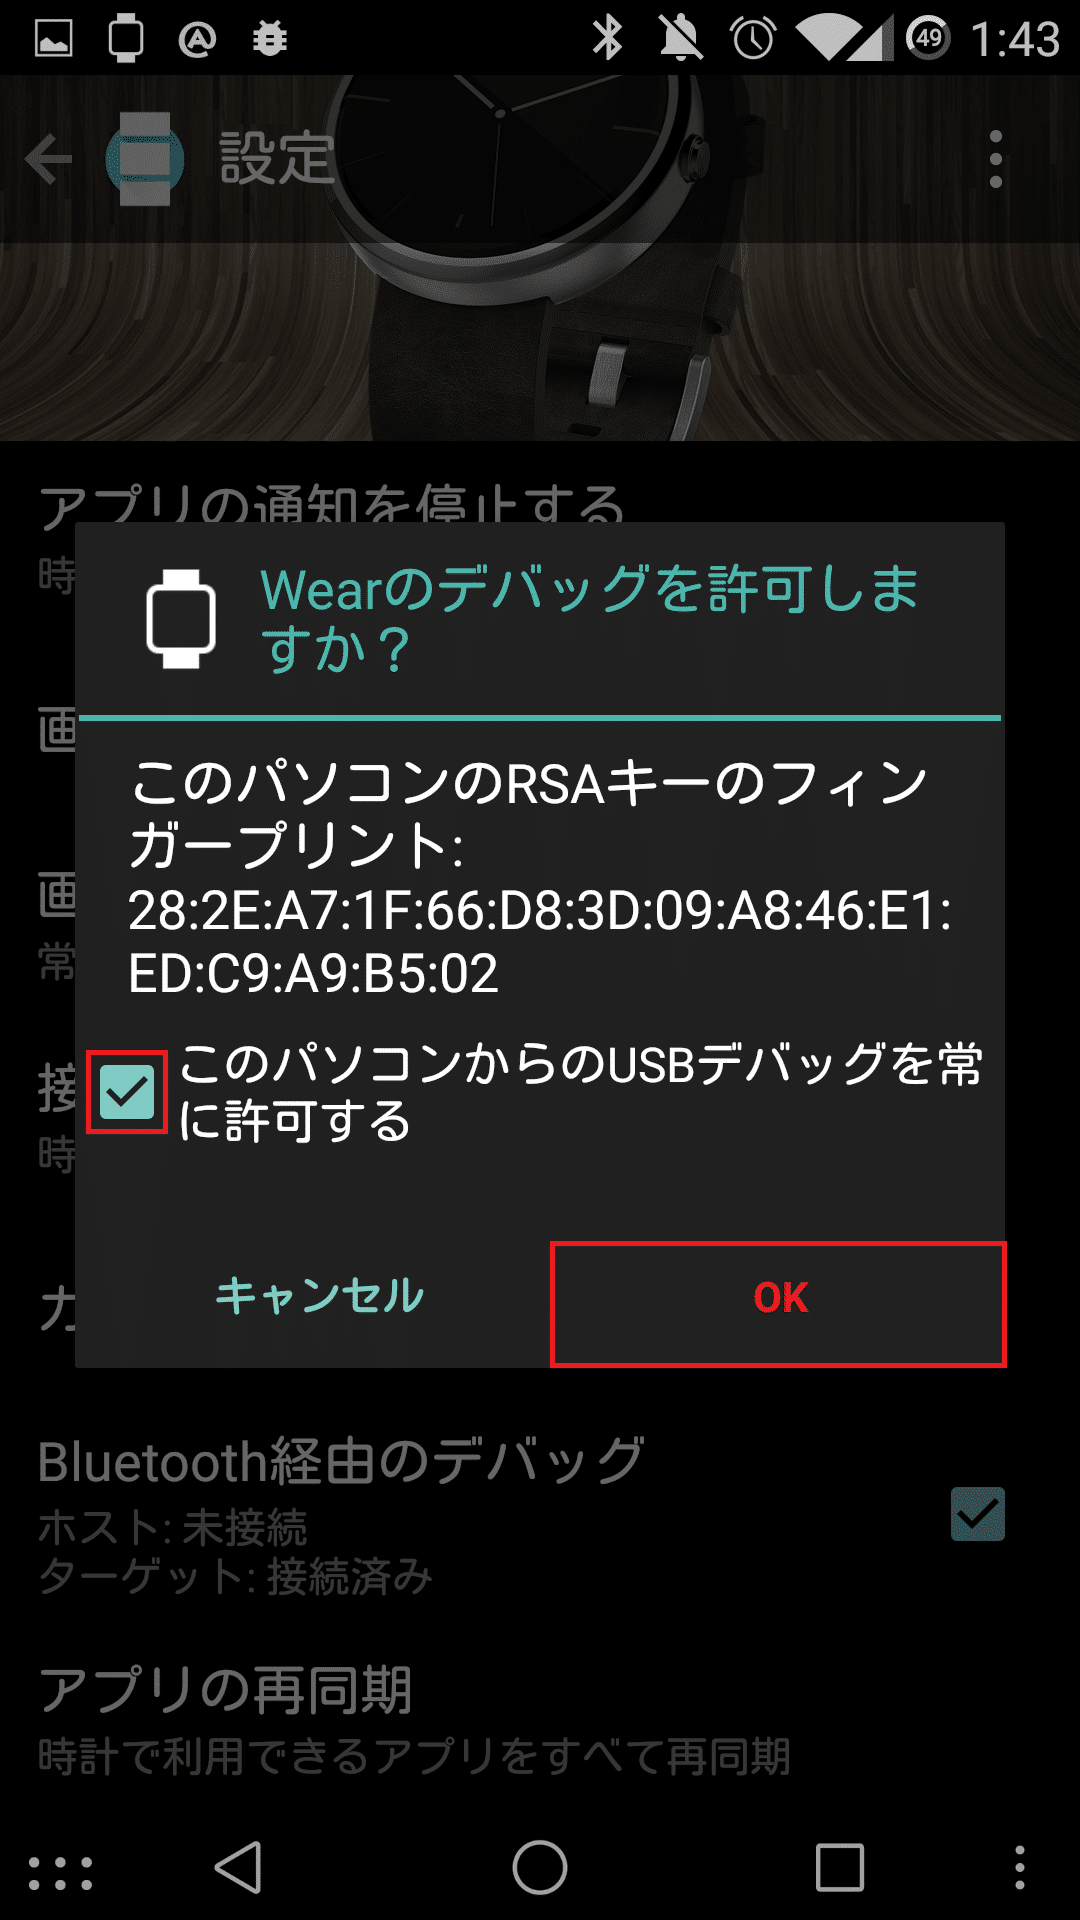
すると、Moto360とペアリングしているAndroidデバイスにデバッグ許可のポップアップが表示されます。
![moto360-bluetooth-debug14](https://androidlover.net/wp-content/uploads/moto360-bluetooth-debug14-281x500.png)
信用できるPCであれば「このパソコンからのUSBデバッグを常に許可する」にチェックを入れて「OK」をタップします。
![moto360-bluetooth-debug15](https://androidlover.net/wp-content/uploads/moto360-bluetooth-debug15-281x500.png)
Android WearアプリのBluetooth経由のデバッグが、ホストもターゲットも「接続済み」になればOKです。
![moto360-bluetooth-debug16](https://androidlover.net/wp-content/uploads/moto360-bluetooth-debug16-281x500.png)
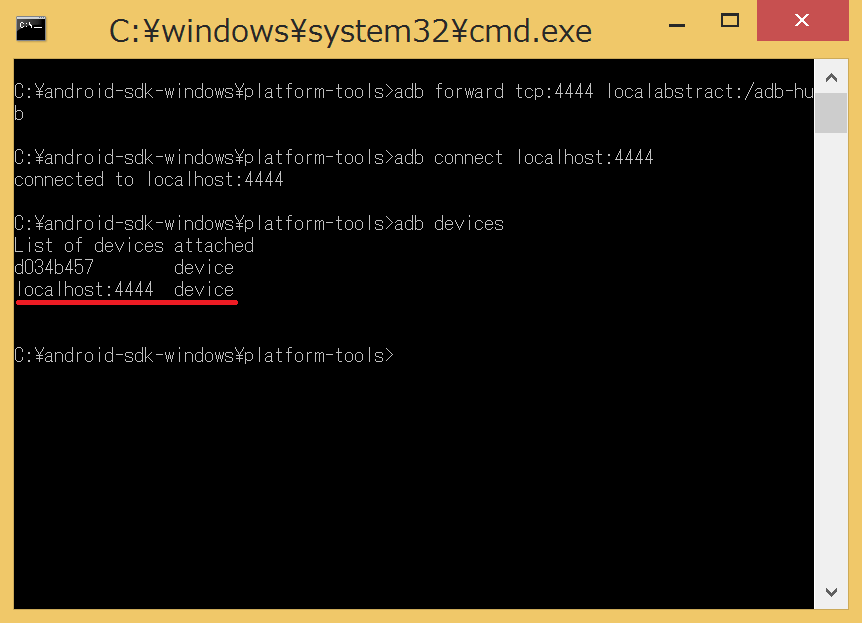
念のため、Moto360がadb接続できているか確認します。コマンドプロンプトで「adb devices」と入力してEnterキーを押します。
![moto360-bluetooth-debug17](https://androidlover.net/wp-content/uploads/moto360-bluetooth-debug17-500x360.png)
「localhost:4444 device」と表示されれば、Moto360が正常にadb接続できています。
![moto360-bluetooth-debug18](https://androidlover.net/wp-content/uploads/moto360-bluetooth-debug18-500x361.png)
Moto360のデバッグモードをBluetooth経由で有効にする方法は以上です。
source:stackoverflow